AI Events
From Shoot Em Up Kit
AI States and Events
In this tutorial we will create an NPC which waits until the player has fired a shot and then chases the player.
We will do this using two AI States. The first will be the Default state and the NPC will just wait without any AI Behaviours. The second state will be the Chase state and will use the Chase AI Behaviour.
The NPC will switch between the AI States by listening for an AI Event. We will set an Action so that when the player presses the fire button it will send an AI State for the NPC to respond to.
AI States
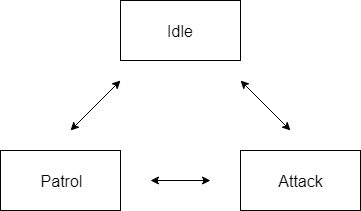
A non-playing character (NPC) can have multiple states. A state can be thought of as the NPC’s current purpose or state of mind. The NPC will only be in one state at a time but can move between different states.
Typical states for a videogame character are Idle, Patrol and Attack. The NPC starts off in an Idle state and waits for a few seconds. The NPC then moves into a Patrol state and follows a spline path. If the NPC sees an enemy (either in the Idle state or the Patrol State) then they will move into the Attack state and will chase and fire at the enemy.
Each state will contain AI Behaviours such as Wait, Move, Follow, Chase and Fire. These behaviours fulfil the purpose of the state, so an Attack state might use the Chase and Fire AI Behaviours.
NPCs change which state they are currently using by generating or responding to AI events.
AI Events
An AI Event can be defined by clicking the ![]() AI Events button on the Definitions window and then creating a name for the event. There are no other properties, an AI event is just a name (or a tag) which we can use to refer to it.
AI Events button on the Definitions window and then creating a name for the event. There are no other properties, an AI event is just a name (or a tag) which we can use to refer to it.
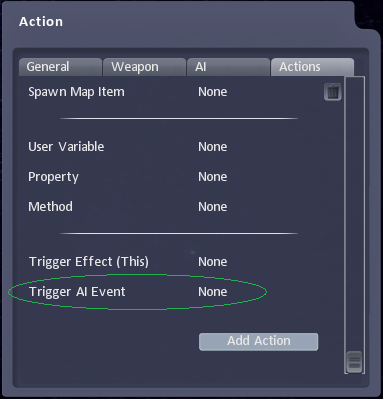
An AI Event can be triggered from an Action event. In the Action tab of many types of object you can specify which AI Event should be triggered when the Action occurs (such as 50% damage, colliding with an object, or a button being pressed).
The Change State AI Behaviours
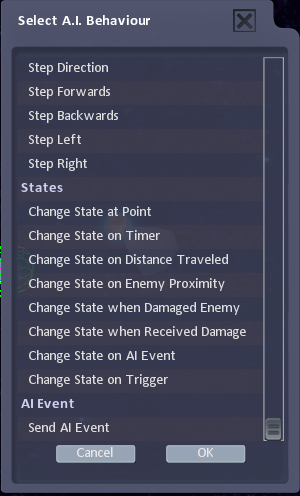
There are many Change State behaviours which can be included within a state. The Change State on Timer behaviour can be used to automatically switch states once a duration of time has passed. The Change State on Enemy Proximity state behaviour will change the NPCs state when it is within a specified distance of their current enemy.
The Change State behaviours allow you to control the flow between the states. For example, an enemy Boss could be created by using states for each of the phases of the enemy’s attack. The first phase would fire two weaker weapons which fire a lot of bullets in an intricate pattern. The first phase would also use a Change State on Timer behaviour to switch to phase 2 after 5 seconds.
Change State on AI Event is useful for responding to AI Events generated by Actions from other objects within the game.
Example: Responding to the Player firing a Bullet.
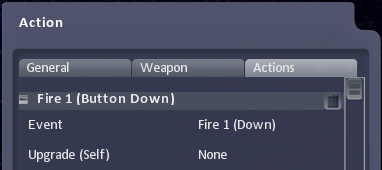
We can add an Action event for the Player and select the Fire 1 (Button Down) event. The Action will trigger whenever the Player presses the Fire 1 button.
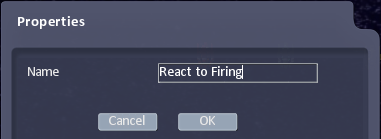
We need to create an AI Event for the NPC to respond to. We can click on the AI Event icon and create an AI Event. We shall call this React to Firing and click the [OK] button.
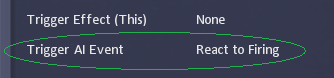
We can now return to the Action tab for the Player and find the Trigger AI Event property. Clicking on None will open a list of AI Events that we’ve created, and we can select our React to Firing event.
We now need to set-up an NPC to respond to this event.
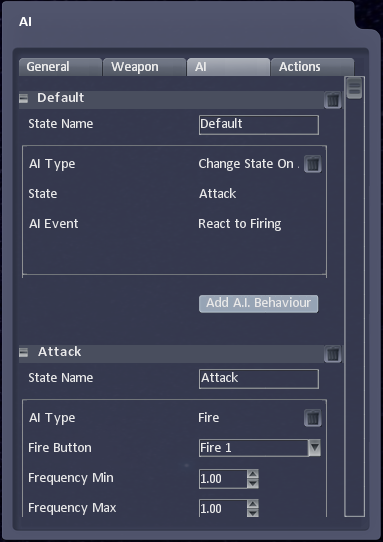
Firstly, we need to go to the AI tab and, in the Default state, add an AI Behaviour. Select Change State on AI Event from the list. Once this has been added to the state, we can select which AI Event we want to react to. This should be our new React to Firing event.
The other property we need to set is the State we should be switching to. We have only got one state at the moment and so we should create a new one by clicking the Add State button. We shall call this new state Attack. We can also take the opportunity to add Fire and Chase behaviours to the Attack state. Don’t forget to specify which Entity the NPC should chase. We’ll make the NPC chase the player.
We can now go back to the State property (in the Default state) and select the Attack state.
We are now all set-up. When we start the game, the NPC will sit patiently until the player presses the fire button. When this happens the NPC will switch into the attack state and will start firing and chasing the player.