Difference between revisions of "Store"
From Shoot Em Up Kit
(Created page with "This is an introduction to setting up a store page - the page will be updated as we add new features to make this more flexible. In this example, there are 2 weapon upgrades t...") |
|||
| (2 intermediate revisions by the same user not shown) | |||
| Line 1: | Line 1: | ||
This is an introduction to setting up a store page - the page will be updated as we add new features to make this more flexible. In this example, there are 2 weapon upgrades to buy. | This is an introduction to setting up a store page - the page will be updated as we add new features to make this more flexible. In this example, there are 2 weapon upgrades to buy. | ||
| + | |||
==Set up the Weapon Variable== | ==Set up the Weapon Variable== | ||
| + | |||
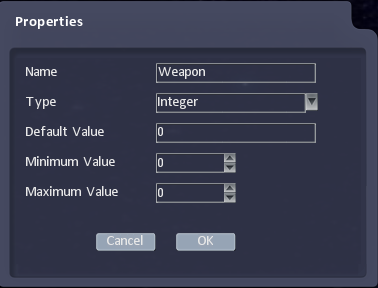
In the [[Level Editor|Level Editor]], select [[Custom Variables|Custom Variables]] from the [[Define Menu|Define Menu]] and select ''Create New''. Set the name, type and initial value: | In the [[Level Editor|Level Editor]], select [[Custom Variables|Custom Variables]] from the [[Define Menu|Define Menu]] and select ''Create New''. Set the name, type and initial value: | ||
| + | |||
[[File:StoreCV.png|link=]] | [[File:StoreCV.png|link=]] | ||
| + | |||
You can also set up a variable for coins held in the same way. | You can also set up a variable for coins held in the same way. | ||
| Line 11: | Line 15: | ||
==Create a Store Page in the Front End Editor== | ==Create a Store Page in the Front End Editor== | ||
| + | |||
In the [[Front-End Editor|Front-End Editor]], select a page for the storefront (in this example I have used the ''Level Complete'' page which is displayed after every level). | In the [[Front-End Editor|Front-End Editor]], select a page for the storefront (in this example I have used the ''Level Complete'' page which is displayed after every level). | ||
| Line 16: | Line 21: | ||
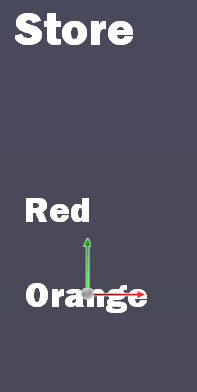
Add text or sprites for the items to buy - in this case, 2 weapon options | Add text or sprites for the items to buy - in this case, 2 weapon options | ||
| + | |||
[[File:StorePage.png|link=]] | [[File:StorePage.png|link=]] | ||
| − | Set the | + | |
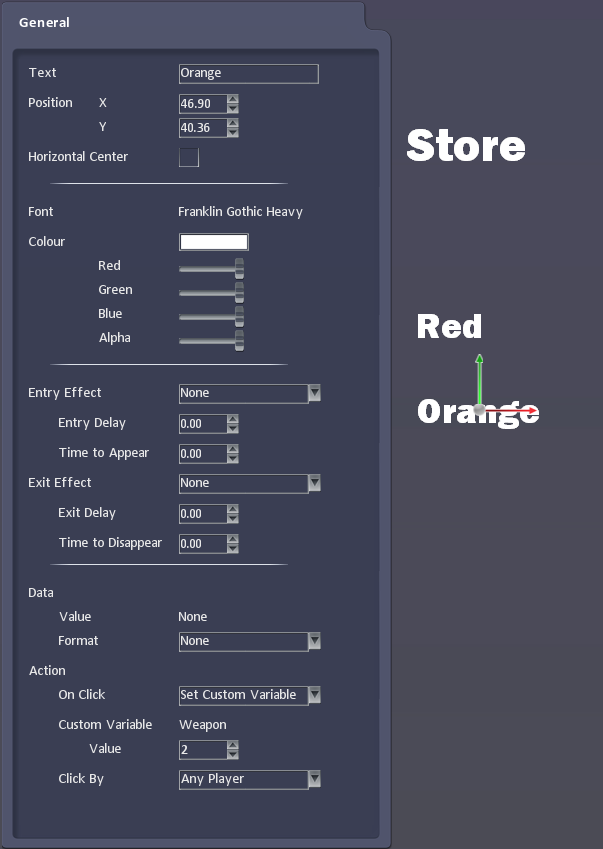
| + | Set the ''On Click'' action to change the Custom variable, in this case to 1 for the red weapon and 2 for orange: | ||
| + | |||
[[File:StoreClickable.png|link=]] | [[File:StoreClickable.png|link=]] | ||
| − | |||
| − | You can set colours for highlighted/selected options in | + | '''FUTURE FEATURE:''' - We are adding the option to have more than one action on click, so you will be able to subtract an amount from the coins variable too when that is in. |
| + | |||
| + | |||
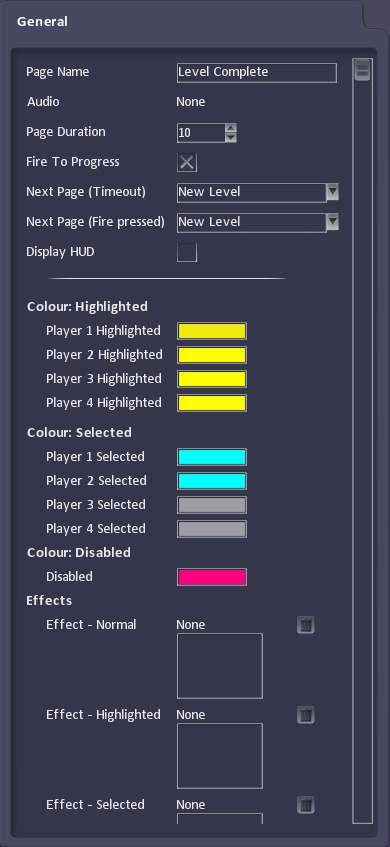
| + | You can set colours for highlighted/selected options in ''Properties'' | ||
| + | |||
[[File:StoreProperties.png|link=]] | [[File:StoreProperties.png|link=]] | ||
| Line 31: | Line 42: | ||
==Set the Player Properties== | ==Set the Player Properties== | ||
| + | |||
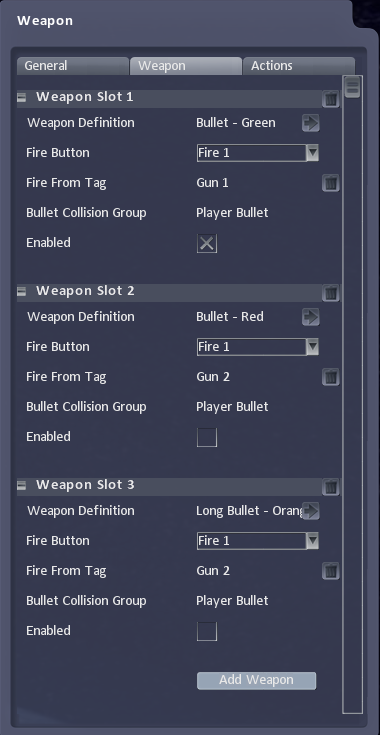
Add weapons to Player Weapon Slot 2 and 3, and set them to be Disabled: | Add weapons to Player Weapon Slot 2 and 3, and set them to be Disabled: | ||
| + | |||
[[File:StoreWeaponSlots.png|link=]] | [[File:StoreWeaponSlots.png|link=]] | ||
| + | |||
Select ''Upgrade'' in the [[Define Menu|Define Menu]] and select ''Create New''. Create 2 upgrades, one for each weapon option in the store, and set them to enable the weapon slots (in this example, the other weapon is disabled too): | Select ''Upgrade'' in the [[Define Menu|Define Menu]] and select ''Create New''. Create 2 upgrades, one for each weapon option in the store, and set them to enable the weapon slots (in this example, the other weapon is disabled too): | ||
| + | |||
[[File:StoreUpgrade.png|link=]] | [[File:StoreUpgrade.png|link=]] | ||
| + | |||
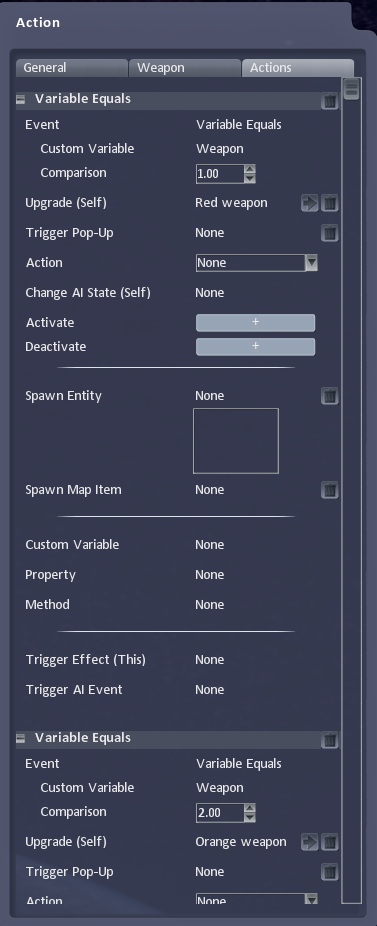
Add [[Actions Tab|Actions]] to the player for ''Variable Equals'' events that trigger the upgrades: | Add [[Actions Tab|Actions]] to the player for ''Variable Equals'' events that trigger the upgrades: | ||
| + | |||
[[File:StoreActions.png|link=]] | [[File:StoreActions.png|link=]] | ||
| + | |||
The ship will now upgrade to the new weapons if they are selected in the store. You can show remaining coins in the [[HUD Editor|HUD]]. | The ship will now upgrade to the new weapons if they are selected in the store. You can show remaining coins in the [[HUD Editor|HUD]]. | ||
Latest revision as of 18:56, 22 September 2020
This is an introduction to setting up a store page - the page will be updated as we add new features to make this more flexible. In this example, there are 2 weapon upgrades to buy.
Set up the Weapon Variable
In the Level Editor, select Custom Variables from the Define Menu and select Create New. Set the name, type and initial value:
You can also set up a variable for coins held in the same way.
Create a Store Page in the Front End Editor
In the Front-End Editor, select a page for the storefront (in this example I have used the Level Complete page which is displayed after every level).
Add text or sprites for the items to buy - in this case, 2 weapon options
Set the On Click action to change the Custom variable, in this case to 1 for the red weapon and 2 for orange:
FUTURE FEATURE: - We are adding the option to have more than one action on click, so you will be able to subtract an amount from the coins variable too when that is in.
You can set colours for highlighted/selected options in Properties
Set the Player Properties
Add weapons to Player Weapon Slot 2 and 3, and set them to be Disabled:
Select Upgrade in the Define Menu and select Create New. Create 2 upgrades, one for each weapon option in the store, and set them to enable the weapon slots (in this example, the other weapon is disabled too):

Add Actions to the player for Variable Equals events that trigger the upgrades:
The ship will now upgrade to the new weapons if they are selected in the store. You can show remaining coins in the HUD.